Erez Marom Photography
Article: Focus Stacking with Photoshop
Posted on 20th August, 2014 - Back to Blog Listings
In the world of photography we often work hard to obtain a shallow depth of field. When we take portraits and wish to separate the subject from the background, we use bulky lenses with large apertures just to get that magical 3D effect we're striving for. In the world of macro photography, as demonstrated in a previous article, things are entirely different.
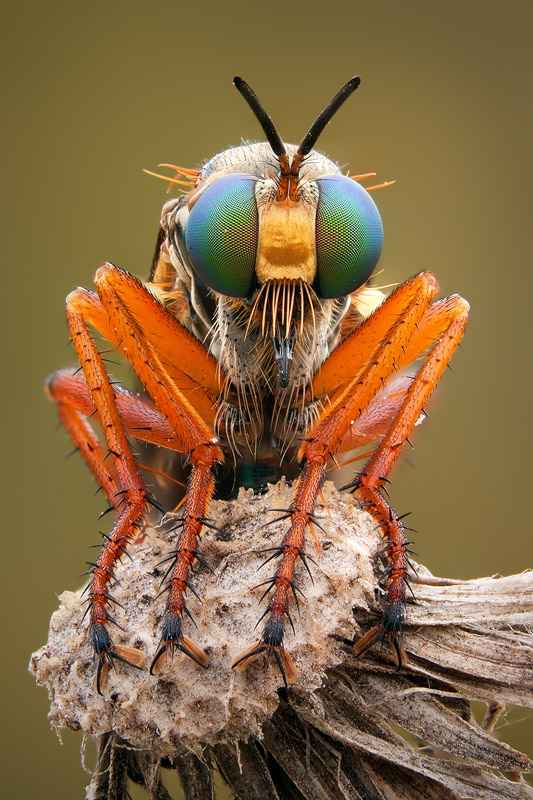
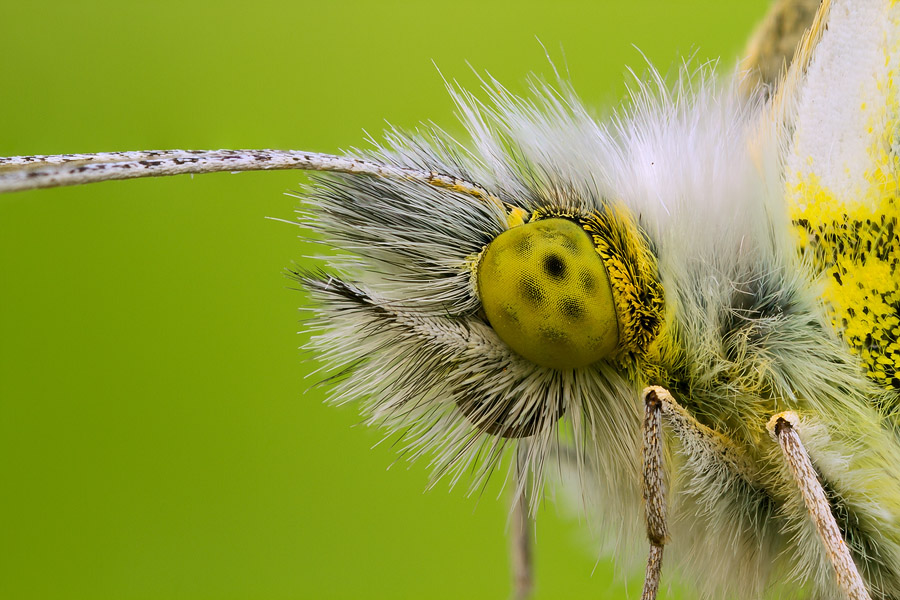
As I’ve mentioned before, depth of field (DOF) depends almost entirely on two factors: aperture value and magnification. The wider the aperture we shoot at, and the closer we get to the subject, the shallower the depth of field becomes. When doing macro work, we often shoot at 1:1 magnification or more, compelling us to be extremely close to the subject. This inevitably means that depth of field is extremely shallow - so shallow that in many cases, most of the subject goes out of focus, even if it's as tiny as a fly, and even if we close the aperture to f/16 or more.
This phenomenon simply results from the rules of optics, and can’t be solved conventionally unless we close the aperture so much that it will critically hurt image quality (and sometime even that doesn’t suffice). Yet it turns out that if we're willing to put in a little more effort and work carefully, we could take macro pictures at any magnification, with close-to-optimal apertures guaranteeing high quality and still get our desired depth of field – all by using a method called focus stacking.
Focus stacking is a process that involves two tasks. The first task is to take a series of pictures at different focal distances, such that the entire depth range we want to have focused is covered by the series. For example, say we're shooting a fly from the front. We will take one picture where the fly’s head is in focus, one with its thorax (middle body-segment) in focus and one with its abdomen in focus.
This may sound easy, but when shooting a live subject in nature (and moreover, as I usually do it, in natural light and extreme magnifications), there are a number of things that can go wrong. For example, the lighting may change if the clouds move, or the subject might decide it doesn't feel like staying put, move and destroy this sensitive process. You must remember that it's critical to get all the images in a stacking series at the exact same conditions and parameters: aperture, ISO, shutter speed and white balance. This might seem obvious but when the light changes, auto WB might shift and shutter speed could change, altering the images to be stacked, which could result in a strange outcome. I recommend shooting in the shade as during periods of as little wind as possible, to get the consistency needed to produce a good stack.
I am a nature photographer, and I only shoot wildlife in the field and not in studios. There are studio-stacking artists out there who produce stacks from hundreds of images, but to do this you have to use some kind of precision rig, as well as studio lights and probably a stone-dead subject, and that's just not what I personally do.
The second task is to combine (or stack) all the pictures from the series into one image. While there are lots of good stacking software out there, I've chosen to show how it's done using Photoshop. It's far from being the best in this department, but it is undoubtedly the best known editing program. Stacking might sound difficult, but Photoshop gives us automatic tools that make it surprisingly easy and fast.
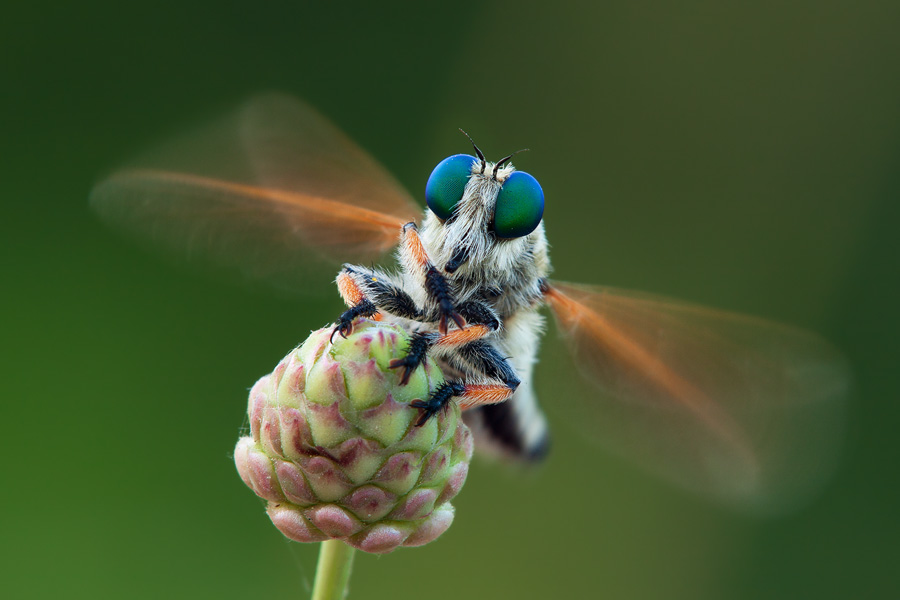
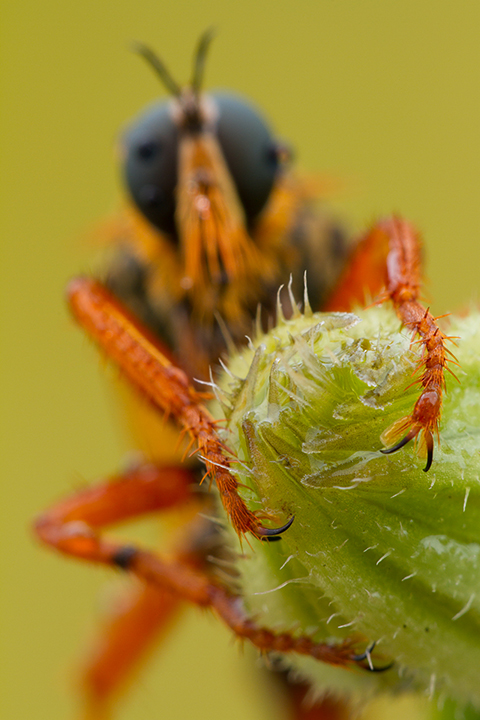
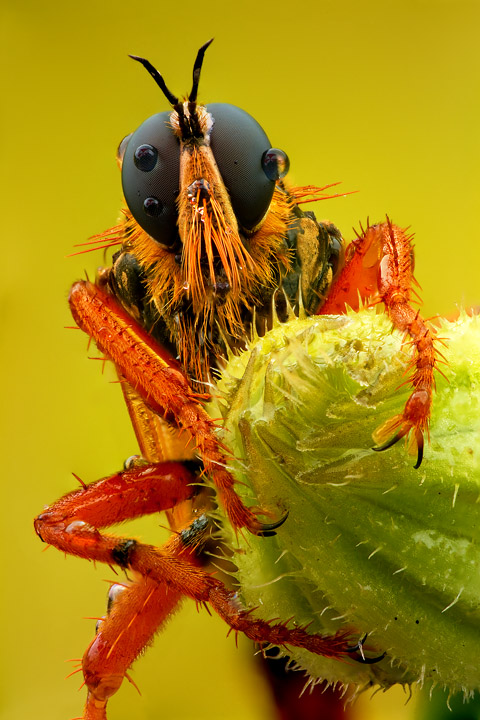
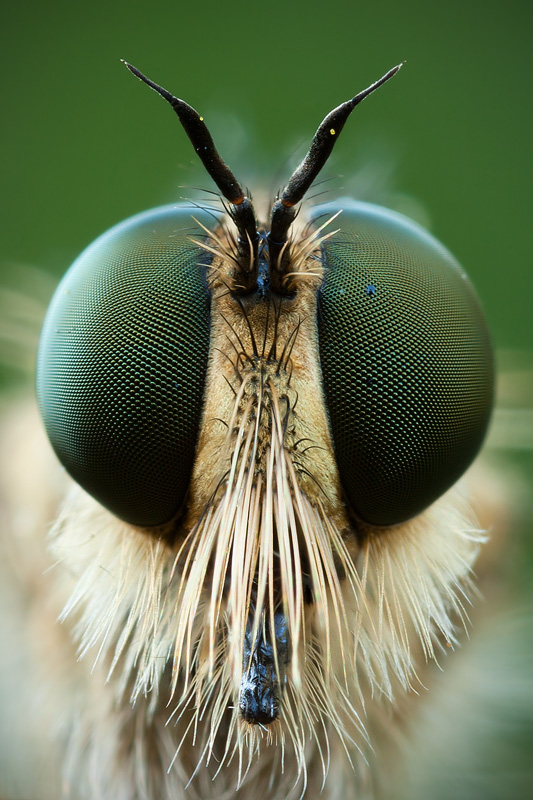
I'll show the process with a series of 4 images of a robber fly I’d like to stack. The series was taken with Canon's MP-E 65mm macro lens, at about 4X magnification and an aperture value of f/10. As is clearly visible, with these magnification and aperture settings, the depth of field in each image is, by far, too small for it to be useable on its own, at least if I want to show all the detail on this fly. Image number 1 is focused on the front of the fly's proboscis, leaving its eyes (the part whose focus is the most critical in wildlife photography), the frost of its head and everything else out of focus. Image 2 shows the hairs on the front of the face in focus, as well as those near the antennae. Image 3 and 4 have different parts of the eyes in focus. All in all, we have all the desired parts of the fly's head in focus, each in different shots.
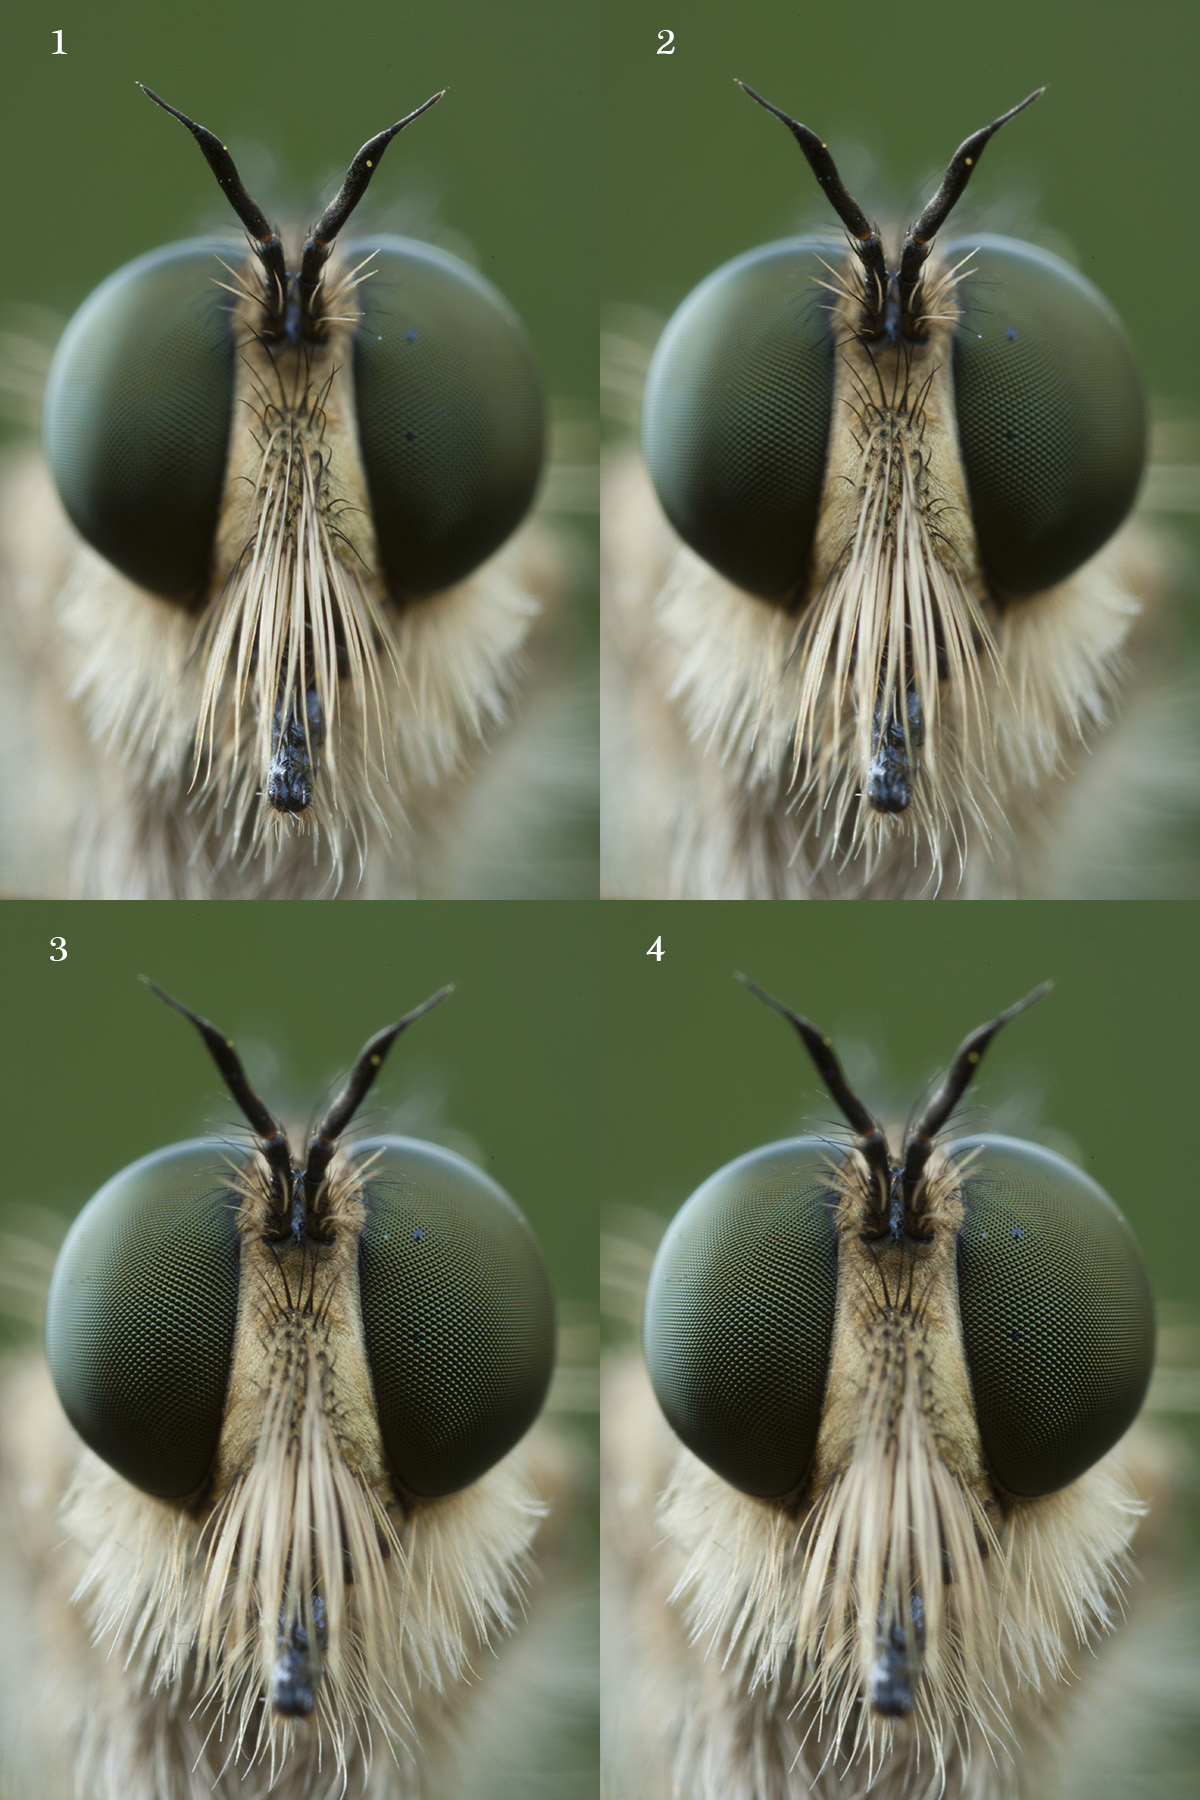
To obtain the image series, I shot it using a tripod and after every shot I gently changed the lens' focal distance, so that in the first image (upper left) the focus is on the tip of the fly's proboscis, in the second image the focus is on the tip of the right eye, and so on, until the last picture is focused on the farthest body part I need focused. It’s very important to mention that I usually do not keep all parts of an insect in focus, even when I focus stack. The reason is that such shots appear very unnatural to the eye and lack the 'natural' macro look I desire. I usually leave a small part of the subject out of focus, to maintain a more natural look, like the one usually obtained in unstacked shots.
Now we can start combining all the pictures into one.There are a few ways of applying the stacking in Photoshop. I'll show the simplest one.
We go to File -> Automate -> Photomerge and get the following menu:
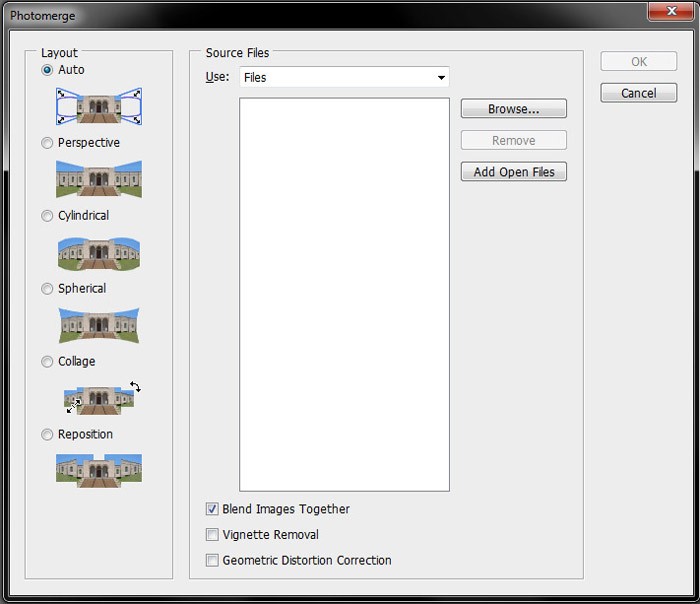
In this menu we select the pictures we want to stack or a folder that contains them. We should also deselect the 'Blend Images Together' option. Next we press OK.
We have to wait for the operation to finish (its duration depending on the number of pictures, their size and format and the machine's processing strength), but when it does, we get a new Photoshop project with all the images arranged in layers and aligned in relation to one another. By the way, if you find it more convenient, this stage can be done manually in Photoshop by loading all the pictures into layers (with the Bridge software, for example), selecting all the layers and using Edit -> Auto-Align Layers. After that you can keep working as described.
When we have the stack series on different layers, all that's left to do is to select all the layers and go to File -> Auto Blend Layers (making sure the 'Stack Images' option is selected), press OK and wait again.
When we apply auto layer blending, Photoshop detects the focused regions of every picture and unites the best-focused parts into one layered project. But now, the layers are masked to only show the focused parts selected by Photoshop. When we merge the layers, we get a focus-stacked image.
Usually, the result isn't perfect. Sometimes you have to crop white edges resulting from automatic alignment or fix places where the software couldn't recognize the layer it should have used, but after a few adjustments we can achieve a shots with a depth of field unobtainable in any other way. After stacking, we can do all the post-processing we usually apply to our macro images.
Some final notes:
- In a sense, it's recommended to change the focal point by moving the lens back and forth rather than using the focus ring, because changing the focal distance in extreme magnification ranges will affect subject magnification drastically, resulting in compositional changes across the series. Note though, that a focusing rail isn't always sturdy enough to allow sufficient stability in field conditions (especially when shooting at extreme magnifications), so use it with great caution. Nowadays, I personally prefer focus-shifting to using a rail, for both convenience and stability reasons. Photoshop's auto align option makes up for all shifts in magnification and composition.
- One can rightfully think of focus stacking as an equivalent to the HDR technique, with focus bracketing instead of exposure bracketing. I agree, and consider these techniques to be members of the image-combination family, so prevalent in the digital photography process today. I even use both simultaneously in landscape photography, when very high contrast appears in conjunction with near and far subjects, requiring focus stacking.
- Many people ask me if I think focus stacking is natural. I've thought quite a bit about this dilemma, and I can now say that I do think it's natural, at least as much as flash photography, high-ISO shooting or any other kind of digital photography technique is natural. Your camera sensor never sees like your eye does, and I suppose if the eye had the same close-focusing abilities as the macro lenses, it might have been able to see something close to the results we get through focus stacking.